What makes a recipe “best” for frozen fish and shellfish
Frozen seafood can be brilliant—if the recipe respects two levers: surface dryness and thickness. Most disappointments come from one of two problems: cooking something too wet (so it steams) or cooking something thick too aggressively (so the outside overcooks before the middle settles).
Here’s the simple framework we use when picking and writing recipes:
Rule 1: Dry → Sear. Get the surface dry and get the pan hot. Moisture is the enemy of colour. If there’s an ice glaze, treat it as protection during storage, then remove it by a quick rinse and thorough pat dry before cooking.
Rule 2: Thin = fast, thick = finish. Thin fillets can cook quickly with direct heat. Thick pieces need a gentler finish (often in the oven) so the centre stays juicy.
Rule 3: Don’t chase the clock—chase cues. Timing changes with piece size, pan heat, and whether it’s IQF (individually quick frozen) or block-frozen. Look for real doneness signs, then trust carryover heat while it rests.
Frozen isn’t scary. It’s just honest: it rewards good method.
Choose by timing: weeknight fast vs weekend impressive
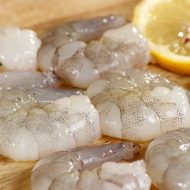
15–25 minutes (fast + tidy). This is your “portion-and-go” zone: fillets, prawns, squid rings, scallops, and anything already portioned. You get speed, portion control, and predictable sizing—perfect for a hot pan, quick sauce, or a tray bake. Best choices here are thinner fillet cuts, peeled shellfish, or small pieces that cook evenly without drama.
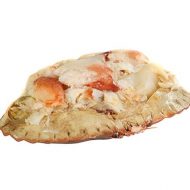
30–45 minutes (proper dinner, still realistic). This is where you can do thicker cuts, oven finishes, and more flavour building. Think a thicker loin piece finished gently, shellfish stirred through a rice dish near the end, or a sauce that simmers while you prep sides. This tier is great for “one main, two sides” meals and builds confidence fast.
Weekend / slow-simmer (impressive + forgiving). Slow recipes are your safety net because sauce and steam can protect texture—if you add seafood at the right moment. This is where shell-on options shine: shell-on prawns in a brothy dish, mixed seafood in a stew, or tail meat folded through a rich base right at the end. It’s also the sweet spot for batch-friendly cooking and leftovers that reheat well.
Fast: choose thin and portioned. Mid: choose thicker and finish gently. Slow: choose sauce and timing.
Choose by heat source: pan, oven, grill, air fryer
Pan
Pan cooking is where you earn colour and flavour—hello maillard. Use it for thin fillets, skin-on portions, scallops, squid, prawns, and small crayfish pieces. The failure mode is sticking and tearing because the pan isn’t hot enough or you moved too soon. The fix: dry the surface, heat the pan properly, add oil, place the seafood down and leave it alone until it releases.
Oven
Oven cooking is your best friend for thick pieces and tray bakes. Use it for thicker loins, stuffed fillets, gratins, and rice dishes that need steady heat. The failure mode is dryness from too much time at high heat. The fix: start hot for colour, then reduce heat or cover briefly; finish gently and protect moisture with a little sauce or basting.
Grill
Grilling gives incredible flavour but demands control. Use it for firm cuts, skewers, larger prawns, and shell-on pieces that protect themselves. The failure mode is flare-ups and drying out. The fix: oil the seafood lightly, use two-zone heat, and pull earlier than you think—then allow resting so the centre relaxes.
Air fryer
Air fryers shine for breaded seafood, seasoned portions, and quick “crispy outside” meals. The failure mode is soggy results because the surface stayed wet: steam is the enemy of crisp. The fix: pat dry, don’t overcrowd, and use a light oil mist or coating that can actually crisp.
Pick the heat source that matches your cut—and your patience.
The outcome playbook: crisp skin, juicy centre, clean flavour
Crisp skin
Skin crisps when it’s dry and the heat is steady. Pat dry the skin, season it, and start in a hot pan. Press gently for the first 20 seconds so the skin meets the metal, then stop touching it. You’ll hear a steady sizzle (not a wet hiss). When it releases easily, it’s ready to flip.
Juicy centre
Juiciness is about not forcing moisture out. If you see a strong “protein squeeze” (white albumin-like stuff pushing out fast), your heat is too aggressive. Dial it back and finish gently—often in the oven—so the centre stays tender. Look for a slight spring when pressed, not stiffness.
Flaky fish
Flaky texture happens when the centre turns from translucent to just set. The flesh should shift from glassy to opaque, and separate into clean layers with a fork. The smell should be sweet and clean, not “hot sea”. Pull it when it’s almost there, then let carryover finish the last bit.
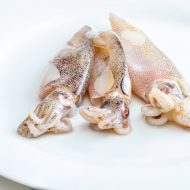
Springy shellfish
Shellfish goes from perfect to rubbery quickly. Watch for colour and feel: prawns curl into a loose “C”, squid turns firm but still yielding, and scallops become pearlescent inside rather than chalky. If you’re adding shellfish to sauce, add it late so it warms through without overcooking.
Good cooking is mostly two things: dry surface, controlled finish.
Crayfish spotlight: fast comfort to dinner-party energy
Crayfish is a high-impact ingredient: sweet, rich, and brilliant at carrying flavour. It’s also forgiving in the right recipes because it loves butter, garlic, acidity, and spice. Whether you’re using crayfish tails or folding crayfish tail meat through a sauce, the goal is the same: warm it through, coat it in flavour, and stop before it tightens.
For weeknights, go comfort-first: buttery garlic, lemon zest, parsley, and a pinch of chilli. Toss through pasta, fold into rice, or spoon over toasted bread. The win is speed—crayfish cooks quickly, and the sauce does most of the work.
For entertaining, go theatre: a seafood rice dish, a baked creamy tray, or a proper bisque-style base that feels restaurant-level without being fussy. A paella approach is especially good because the rice and aromatics build depth, and the crayfish arrives late in the process to stay tender. If you like bold flavours, cajun butter turns crayfish into an instant centrepiece.
A simple pairing grid (in plain English): Crayfish loves acidity (lemon, white wine, tomatoes), herbs (parsley, dill, chives), and heat (chilli, paprika, pepper) because it amplifies shellfish sweetness without masking it.
Make crayfish routine, and “special” starts happening on regular nights.
Pantry partners: rice, sauces, and the one-pan win
The fastest way to make seafood feel like a full meal is to keep a few pantry partners ready. Rice, pasta, tinned tomatoes, good stock, and a couple of spices turn “protein + side” into “proper dinner” with one pan and less washing up.
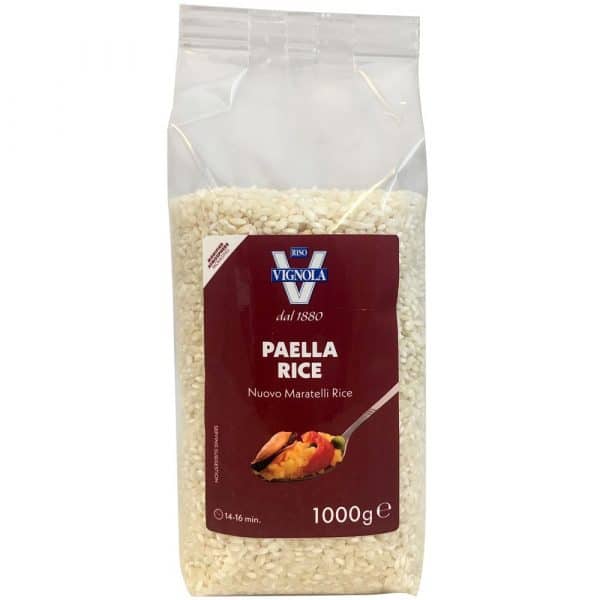
A favourite staple for seafood nights is paella rice because it handles liquid well and stays satisfying without going mushy when you get the timing right. Build the base with onion, garlic, and peppers; add smoked paprika for depth and a pinch of saffron when you want it to feel special. A splash of seafood stock makes the whole thing taste intentional, even on a weeknight.
The one-pan win is about sequencing: cook your aromatics first, cook the starch until it’s nearly done, then add seafood near the end so it stays tender. Fish gets the gentler finish, shellfish gets the quick warm-through, and you get a meal that tastes like you planned it days ago.
Cook smarter: choose a pantry partner, then choose seafood that suits it.
“Recipe to basket” thinking: choose cut, then choose method
Great seafood cooking gets easy when you shop with the end method in mind. Cut shape, thickness, and whether it’s skin or shell protected tells you how to cook it.
- If it’s thick, then sear for colour and finish in the oven.
- If it’s thin, then keep it hot and quick with direct heat.
- If it’s skin-on, then start skin-side down for protection and crispness.
- If it’s in a sauce, then add it late so it warms without tightening.
That’s it. You’re not “following a recipe” as much as you’re choosing the right physics for the food.
A few cut notes that help instantly:
- Skinless fish is more delicate, so it benefits from sauce, butter, or a gentler finish.
- Butterflied pieces cook faster because thickness drops—great for grills and quick pans.
- Whole shell-on pieces protect moisture and flavour, but need a little extra time and space.
To avoid moisture loss, keep high heat for the outside and calm heat for the centre.
Trust layer: what you’ll see on the pack
Buying frozen seafood should feel straightforward. Clear labelling matters because it connects directly to cooking results: you want to know what cut you’re getting, how big it is, and how it’s packed so you can predict how it will behave in your pan.
Size consistency is the secret weapon. When portions are similar, your doneness cues become reliable. Packaging matters too: many items are vacuum packed, which helps protect flavour and texture by reducing air exposure. You may also see glazing on some seafood—this is a protective layer of ice that helps prevent dehydration during storage, not a trick. The goal is simple: keep the seafood in good condition until you cook it.
Good information also supports confidence: origin details, a production lot, and basic traceability cues help you understand what you’re cooking, not just what you’re buying. And if a product is described as portionable, that’s a practical signal that it’s designed to be split, used, and stored without waste.
What to check first:
- Cut type (fillet, loin, whole, tail, peeled/shell-on)
- Size/weight so your method matches the thickness
- Pack type (vacuum pack, IQF, or block)
- Any on-pack cooking notes for that specific item
Delivery confidence: still frozen to the door
Frozen seafood only works if the cold stays unbroken—and that’s the point of the system. Orders are shipped with DPD using an insulated box and dry ice, designed to keep your seafood frozen through transit so it arrives ready for the freezer, not the sink.
The practical outcome is simple: your seafood is protected from temperature swings, and you can plan meals with less anxiety. Many customers build a weekly rhythm—order, store, cook—because it turns seafood into something reliable, not a special-event stress.
A few useful realities to keep expectations clean: delivery options and valid dates are shown at checkout, and there’s a minimum order to make frozen shipping work properly. When it lands, move items straight into the freezer and keep the packaging closed until you’re ready to put things away.
- Cold chain packaging helps keep seafood in “deep-frozen” condition
- Dry ice supports stable low temperatures in transit
- Next-working-day delivery is designed for predictable planning
Order with confidence: frozen stays frozen, and dinner gets easier.
Why frozenfish.direct
Predictable portions for predictable cooking outcomes.
That means less guesswork: similar size pieces tend to finish at the same time.
Cold-chain shipping built for frozen seafood, not “maybe cool enough”.
Insulated packaging and dry ice support stable temperatures through transit.
Range that supports real cooking, not just single-occasion buying.
From portion-cut staples to entertaining pieces, you can build a freezer that makes sense.
Pack-first practicality: store-ready, portion-ready, weeknight-ready.
Many items arrive in formats that are easy to freeze flat and use without waste.
Cook-from-frozen friendly options for busy nights.
Some cuts and preparations are designed to go straight to heat when method is right.
One UVP that matters in real life: frozenfish.direct is built around repeatable home results—the kind that turns seafood into a routine, not a rare gamble.
Your next step
- Choose a 20-minute weeknight recipe built for a hot pan.
- Cook crayfish tails in butter-garlic for a fast comfort dinner.
- Bake a tray seafood dinner in the oven with a gentle finish.
- Serve a weekend rice dish that feels like entertaining without stress.
- Prep portioned seafood for lunch rotation and freezer rhythm.
- Grill firm cuts for smoky flavour with less guesswork.
Frequently Asked Questions
Are frozen fish recipes as good as fresh?
They can be—sometimes better—because “fresh” doesn’t automatically mean “best handled”. The real comparison is time and care. Seafood is at its best when it’s treated well from catch to kitchen, and freezing can lock in quality at a specific point on that timeline. If something spends days being transported, stored, and displayed, it may still be sold as “fresh”, but it’s travelled further along that clock.
Frozen recipes succeed when you respect two things: the surface and the finish. If you cook seafood while it’s wet, it steams instead of browning, so you lose flavour and texture. A dry surface is the crispness lever—patting dry, using a hot pan, and giving the food space to cook transforms the result. The second lever is finishing gently. Thick pieces need time for heat to move through without forcing moisture out, so a quick sear followed by an oven finish often beats aggressive pan cooking.
What can go wrong? Freezer burn can dull flavour and toughen texture if the product has been exposed to air for too long. Thawing badly can waterlog the surface, making it harder to brown and easier to overcook. And high heat for too long can push moisture out fast, giving you dry fish or rubbery shellfish.
What helps a lot is good packaging. Many products are vacuum packed, which reduces air exposure and helps protect texture in storage. Then your job is simple: keep the pack cold, thaw safely when needed, dry the surface, and cook with controlled heat.
If you want predictable results, frozen is often the easier way to make seafood a routine—because it lets you cook at the moment that suits you, not the moment the clock forces.
Can I cook seafood from frozen?
Yes—often you can—but method matters. The reason is physics, not tradition: thickness and surface area decide how evenly something cooks. A thin fillet has lots of surface compared to its centre, so heat reaches the middle quickly. A thick loin has a bigger “cold core”, so the outside can overcook before the centre catches up unless you manage the heat.
There’s also the surface issue. Frozen seafood often carries moisture on the outside (and sometimes a light protective ice layer). If you throw it straight into a pan without thinking, you’ll get a wet sizzle that turns into steaming. And steam is useful—until it ruins crisp. Steam can help warm something through, but if you want browning, you need the surface dry by the time you sear.
Here are three patterns that work well:
- 1) Sear + oven finish (for thicker pieces). Start with high heat to build colour, then move to the oven so the centre warms gently. This is a reliable way to keep the outside tasty and the inside juicy.
- 2) Covered start → uncover → sear (for controlling the centre). Begin with a short covered phase so heat moves inward, then uncover to evaporate moisture and finish with direct heat for colour. It’s a smart way to avoid “burnt outside, cold inside”.
- 3) Sauce-based simmer (for shellfish and mixed seafood). A simmering sauce is forgiving because it controls temperature. The key is timing: add seafood late so it warms through without overcooking. Shellfish is especially sensitive—warm it, coat it, stop.
Doneness cues beat strict timing. Fish should turn opaque and flake into layers, not crumble dry. Prawns should curl into a loose “C”, not a tight ball. Squid should be tender (quick cook) or very tender (long cook)—the middle ground is where rubber lives.
One calm caution: always check any on-pack guidance for the specific item you’re cooking, because size and preparation can change the safest and best method.
What’s the best way to defrost fish for perfect texture?
The best defrost method is the one that protects texture and keeps things food-safe. For most fish and shellfish, slow and sealed wins: it reduces moisture loss, prevents odours moving around your fridge, and keeps the surface from turning soggy.
Fridge thaw (best for texture). Put the seafood in the fridge and let it thaw gradually. Keep it in the sealed pack so it doesn’t absorb water or fridge smells. Slow thawing gives ice crystals time to melt without tearing the flesh too aggressively, which helps keep the final texture juicy and clean.
Cold-water thaw (good for speed, still controlled). If you’re short on time, keep the seafood in the sealed pack and submerge it in cold water. Change the water occasionally so it stays cold. This speeds thawing without the risks of warmer temperatures. The key is keeping it sealed so water doesn’t soak into the surface, which can make browning harder later.
Avoid room-temperature thawing. It’s tempting, but don’t thaw at room temperature because the outside can warm into unsafe territory while the centre is still frozen. It’s not worth the risk, and it often worsens texture by making the surface wet.
Texture cues help you know you’re on track:
- Good thaw: the piece is flexible, the surface feels clean, and it doesn’t leak a lot of watery liquid.
- Not great: the surface feels slimy or waterlogged, or there’s a strong “fishy” smell.
- Ready to cook: you can press the thickest part and it yields slightly, without a hard icy core.
A quick weeknight “emergency plan”: if the centre is still slightly firm, that can be okay for oven finishes and sauce-based recipes, because gentle heat can complete the thaw as it cooks. The trick is to avoid high-heat pan cooking on a half-frozen thick piece—outside will overcook while the inside catches up.
Dry the surface before cooking, and you’ll get far better colour and flavour.
How long does frozen seafood last, and how do I avoid freezer burn?
Two things can be true at the same time: frozen seafood can remain safe for a very long time at proper freezer temperatures, and the eating quality can still decline over time. That’s the heart of quality vs safety. Safety is mostly about staying frozen and avoiding contamination; quality is about flavour, texture, and how “fresh” it tastes when cooked.
The main enemy of quality in the freezer is freezer burn. Freezer burn is dehydration caused by air exposure. Water slowly leaves the surface of the food and forms ice crystals elsewhere, leaving dry, damaged areas behind. You’ll usually spot it as pale or greyish dry patches, a dull colour, or edges that look rough. When cooked, freezer-burned areas can taste flat and feel tougher or stringier.
Prevention is mostly practical habits, not fancy equipment:
- Keep packs sealed and undamaged; rewrap securely if you open something.
- Minimise air in any resealed bag—press out as much as you can.
- Store flat where possible so items freeze and stay cold evenly.
- Rotate stock: first in, first out, so older items get used earlier.
- Keep the freezer stable: frequent temperature swings worsen quality.
Packaging helps a lot. Many seafood products are vacuum packed, which reduces the amount of air touching the food and slows dehydration. If you open a pack and don’t use everything, reseal tightly and get it back into a cold, stable part of the freezer.
If you ever wonder whether something is “still good,” look at the condition: ice build-up inside a pack, lots of frost, or obvious dry patches suggest quality has slipped—even if safety is likely still fine when kept frozen. When in doubt, follow on-pack storage instructions and use common sense.
Good packaging and steady cold are what keep seafood tasting like seafood.
Which cuts should I buy for pan-searing vs oven-baking vs grilling?
The best cut is the one that matches your heat source. You’re choosing a cooking strategy as much as a product. The three biggest decision points are thickness, fat content, and whether the food has protection (skin or shell).
For pan-searing: Choose thinner portions, smaller shellfish, and pieces that can cook quickly. Skin-on fish is excellent because skin-on helps protection and gives you the option of crispness. Pan-searing loves dry surfaces and steady heat—so pat dry, use a hot pan, and don’t move it too soon. Common mistake: turning too early and tearing the fish. Fix: wait until it releases easily.
For oven-baking: Choose thicker pieces, stuffed or topped portions, and anything you want to cook evenly with less stress. The oven is forgiving and helps keep the centre tender. Common mistake: too much heat for too long, which dries fish out. Fix: build colour early (brief high heat) then reduce or cover; finish gently so moisture stays in.
For grilling: Choose firmer cuts, skewers, and shell-on pieces that can handle high heat without falling apart. Grilling is about quick sear and controlled timing. Common mistake: flare-ups and dryness. Fix: oil lightly, use two-zone heat, and pull early—rest will do the final work.
If you only buy one thing, buy a versatile mid-thickness portion that can sear and also finish in the oven. It gives you the most flexibility across pan, oven, and even gentle grill cooking.
What arrives in the box, and how does it stay frozen?
When frozen seafood arrives properly, it should feel calm—not like a race against melting. The delivery setup is designed to keep the cold stable so your food arrives in a “still frozen” state and can go straight into the freezer.
Your order is shipped in an insulated container with dry ice. The insulation slows heat entering the box, and the dry ice provides deep cold support during transit. It’s a simple system with one goal: keep temperature swings small so texture and quality stay protected. With next-working-day delivery via an overnight courier, the box is built to bridge the journey and arrive still frozen to the door.
When you open it, do two things first: keep the box open only as long as needed, and move items into the freezer quickly. Then treat dry ice with respect. Dry ice is extremely cold and can cause burns if handled carelessly. Avoid touching it with bare skin. Keep the area ventilated, and don’t place dry ice in sealed containers. If there are small leftover pieces, let them dissipate safely in a well-ventilated space, away from children and pets.
You might notice a chill haze or “smoke” effect when the box opens—this can happen around very cold vapour and is not unusual in a dry-ice shipment. Focus on the practical check: items should feel frozen, firm, and cold to the touch through the pack.
A note on expectations: there’s a minimum order because frozen shipping is a specialist job—packaging and cold support need to be worthwhile and effective. Delivery date options are shown at checkout so you can choose a day that suits your freezer and your schedule.
Done right, unboxing should feel like this: open, move to freezer, close, relax.
{
"@context": "https://schema.org",
"@type": "FAQPage",
"@id": "https://frozenfish.direct/recipes/paella-rice-1kg-bag/#FAQPage",
"mainEntity": [{
"@type": "Question",
"name": "Are frozen fish recipes as good as fresh?",
"acceptedAnswer": {
"@type": "Answer",
"text": "They can be—sometimes better—because “fresh” doesn’t automatically mean “best handled”. The real comparison is time and care. Seafood is at its best when it’s treated well from catch to kitchen, and freezing can lock in quality at a specific point on that timeline. If something spends days being transported, stored, and displayed, it may still be sold as “fresh”, but it’s travelled further along that clock.
Frozen recipes succeed when you respect two things: the surface and the finish. If you cook seafood while it’s wet, it steams instead of browning, so you lose flavour and texture. A dry surface is the crispness lever—patting dry, using a hot pan, and giving the food space to cook transforms the result. The second lever is finishing gently. Thick pieces need time for heat to move through without forcing moisture out, so a quick sear followed by an oven finish often beats aggressive pan cooking.
What can go wrong? Freezer burn can dull flavour and toughen texture if the product has been exposed to air for too long. Thawing badly can waterlog the surface, making it harder to brown and easier to overcook. And high heat for too long can push moisture out fast, giving you dry fish or rubbery shellfish.
What helps a lot is good packaging. Many products are vacuum packed, which reduces air exposure and helps protect texture in storage. Then your job is simple: keep the pack cold, thaw safely when needed, dry the surface, and cook with controlled heat.
If you want predictable results, frozen is often the easier way to make seafood a routine—because it lets you cook at the moment that suits you, not the moment the clock forces."
}
}, {
"@type": "Question",
"name": "Can I cook seafood from frozen?",
"acceptedAnswer": {
"@type": "Answer",
"text": "Yes—often you can—but method matters. The reason is physics, not tradition: thickness and surface area decide how evenly something cooks. A thin fillet has lots of surface compared to its centre, so heat reaches the middle quickly. A thick loin has a bigger “cold core”, so the outside can overcook before the centre catches up unless you manage the heat.
There’s also the surface issue. Frozen seafood often carries moisture on the outside (and sometimes a light protective ice layer). If you throw it straight into a pan without thinking, you’ll get a wet sizzle that turns into steaming. And steam is useful—until it ruins crisp. Steam can help warm something through, but if you want browning, you need the surface dry by the time you sear.
Here are three patterns that work well:
1) Sear + oven finish (for thicker pieces). Start with high heat to build colour, then move to the oven so the centre warms gently. This is a reliable way to keep the outside tasty and the inside juicy.
2) Covered start → uncover → sear (for controlling the centre). Begin with a short covered phase so heat moves inward, then uncover to evaporate moisture and finish with direct heat for colour. It’s a smart way to avoid “burnt outside, cold inside”.
3) Sauce-based simmer (for shellfish and mixed seafood). A simmering sauce is forgiving because it controls temperature. The key is timing: add seafood late so it warms through without overcooking. Shellfish is especially sensitive—warm it, coat it, stop.
Doneness cues beat strict timing. Fish should turn opaque and flake into layers, not crumble dry. Prawns should curl into a loose “C”, not a tight ball. Squid should be tender (quick cook) or very tender (long cook)—the middle ground is where rubber lives.
One calm caution: always check any on-pack guidance for the specific item you’re cooking, because size and preparation can change the safest and best method."
}
}, {
"@type": "Question",
"name": "What’s the best way to defrost fish for perfect texture?",
"acceptedAnswer": {
"@type": "Answer",
"text": "The best defrost method is the one that protects texture and keeps things food-safe. For most fish and shellfish, slow and sealed wins: it reduces moisture loss, prevents odours moving around your fridge, and keeps the surface from turning soggy.
Fridge thaw (best for texture). Put the seafood in the fridge and let it thaw gradually. Keep it in the sealed pack so it doesn’t absorb water or fridge smells. Slow thawing gives ice crystals time to melt without tearing the flesh too aggressively, which helps keep the final texture juicy and clean.
Cold-water thaw (good for speed, still controlled). If you’re short on time, keep the seafood in the sealed pack and submerge it in cold water. Change the water occasionally so it stays cold. This speeds thawing without the risks of warmer temperatures. The key is keeping it sealed so water doesn’t soak into the surface, which can make browning harder later.
Avoid room-temperature thawing. It’s tempting, but don’t thaw at room temperature because the outside can warm into unsafe territory while the centre is still frozen. It’s not worth the risk, and it often worsens texture by making the surface wet.
Texture cues help you know you’re on track:
Good thaw: the piece is flexible, the surface feels clean, and it doesn’t leak a lot of watery liquid.
Not great: the surface feels slimy or waterlogged, or there’s a strong “fishy” smell.
Ready to cook: you can press the thickest part and it yields slightly, without a hard icy core.
A quick weeknight “emergency plan”: if the centre is still slightly firm, that can be okay for oven finishes and sauce-based recipes, because gentle heat can complete the thaw as it cooks. The trick is to avoid high-heat pan cooking on a half-frozen thick piece—outside will overcook while the inside catches up.
Dry the surface before cooking, and you’ll get far better colour and flavour."
}
}, {
"@type": "Question",
"name": "How long does frozen seafood last, and how do I avoid freezer burn?",
"acceptedAnswer": {
"@type": "Answer",
"text": "Two things can be true at the same time: frozen seafood can remain safe for a very long time at proper freezer temperatures, and the eating quality can still decline over time. That’s the heart of quality vs safety. Safety is mostly about staying frozen and avoiding contamination; quality is about flavour, texture, and how “fresh” it tastes when cooked.
The main enemy of quality in the freezer is freezer burn. Freezer burn is dehydration caused by air exposure. Water slowly leaves the surface of the food and forms ice crystals elsewhere, leaving dry, damaged areas behind. You’ll usually spot it as pale or greyish dry patches, a dull colour, or edges that look rough. When cooked, freezer-burned areas can taste flat and feel tougher or stringier.
Prevention is mostly practical habits, not fancy equipment:
Keep packs sealed and undamaged; rewrap securely if you open something.
Minimise air in any resealed bag—press out as much as you can.
Store flat where possible so items freeze and stay cold evenly.
Rotate stock: first in, first out, so older items get used earlier.
Keep the freezer stable: frequent temperature swings worsen quality.
Packaging helps a lot. Many seafood products are vacuum packed, which reduces the amount of air touching the food and slows dehydration. If you open a pack and don’t use everything, reseal tightly and get it back into a cold, stable part of the freezer.
If you ever wonder whether something is “still good,” look at the condition: ice build-up inside a pack, lots of frost, or obvious dry patches suggest quality has slipped—even if safety is likely still fine when kept frozen. When in doubt, follow on-pack storage instructions and use common sense.
Good packaging and steady cold are what keep seafood tasting like seafood."
}
}, {
"@type": "Question",
"name": "Which cuts should I buy for pan-searing vs oven-baking vs grilling?",
"acceptedAnswer": {
"@type": "Answer",
"text": "The best cut is the one that matches your heat source. You’re choosing a cooking strategy as much as a product. The three biggest decision points are thickness, fat content, and whether the food has protection (skin or shell).
For pan-searing: Choose thinner portions, smaller shellfish, and pieces that can cook quickly. Skin-on fish is excellent because skin-on helps protection and gives you the option of crispness. Pan-searing loves dry surfaces and steady heat—so pat dry, use a hot pan, and don’t move it too soon. Common mistake: turning too early and tearing the fish. Fix: wait until it releases easily.
For oven-baking: Choose thicker pieces, stuffed or topped portions, and anything you want to cook evenly with less stress. The oven is forgiving and helps keep the centre tender. Common mistake: too much heat for too long, which dries fish out. Fix: build colour early (brief high heat) then reduce or cover; finish gently so moisture stays in.
For grilling: Choose firmer cuts, skewers, and shell-on pieces that can handle high heat without falling apart. Grilling is about quick sear and controlled timing. Common mistake: flare-ups and dryness. Fix: oil lightly, use two-zone heat, and pull early—rest will do the final work.
If you only buy one thing, buy a versatile mid-thickness portion that can sear and also finish in the oven. It gives you the most flexibility across pan, oven, and even gentle grill cooking."
}
}, {
"@type": "Question",
"name": "What arrives in the box, and how does it stay frozen?",
"acceptedAnswer": {
"@type": "Answer",
"text": "When frozen seafood arrives properly, it should feel calm—not like a race against melting. The delivery setup is designed to keep the cold stable so your food arrives in a “still frozen” state and can go straight into the freezer.
Your order is shipped in an insulated container with dry ice. The insulation slows heat entering the box, and the dry ice provides deep cold support during transit. It’s a simple system with one goal: keep temperature swings small so texture and quality stay protected. With next-working-day delivery via an overnight courier, the box is built to bridge the journey and arrive still frozen to the door.
When you open it, do two things first: keep the box open only as long as needed, and move items into the freezer quickly. Then treat dry ice with respect. Dry ice is extremely cold and can cause burns if handled carelessly. Avoid touching it with bare skin. Keep the area ventilated, and don’t place dry ice in sealed containers. If there are small leftover pieces, let them dissipate safely in a well-ventilated space, away from children and pets.
You might notice a chill haze or “smoke” effect when the box opens—this can happen around very cold vapour and is not unusual in a dry-ice shipment. Focus on the practical check: items should feel frozen, firm, and cold to the touch through the pack.
A note on expectations: there’s a minimum order because frozen shipping is a specialist job—packaging and cold support need to be worthwhile and effective. Delivery date options are shown at checkout so you can choose a day that suits your freezer and your schedule.
Done right, unboxing should feel like this: open, move to freezer, close, relax."
}
}],
"isPartOf": {
"@id": "https://frozenfish.direct/recipes/paella-rice-1kg-bag/#Article"
}
}
.centerdiv{float:none;margin:0 auto}
.sseo_faqs{counter-reset:faq-counter}
.sseo_faqs .sseo_faqcont .sseo_faqtitle{color:#ffffff!important; background:#2d7ccb!important;}
.sseo_faqs .sseo_faqcont .sseo_faqtitle:before{background:#000000!important;color:#ffffff!important;}
.sseo_faqs .sseo_faqcont .sseo_faqtitle:before{counter-increment:faq-counter;content:"Q" counter(faq-counter);position:absolute;top:0;bottom:0;left:0;width:48px;height:auto;font-size:20px;line-height:52px;text-align:center;font-family:"Aparajita", sans-serif;font-weight:600}
.sseo_faqs, .sseo_faqcont{position:relative;float:left;width:100%;margin-bottom:12px;text-align:left}
.sseo_faqs .sseo_faqtitle{font-family:inherit!important; font-weight:inherit!important;position:relative;float:left;width:100%;padding:12px 45px 12px 58px!important;cursor:pointer;font-weight:500; font-size: 20px; color:var(--main-color);}
.sseo_faqs .sseo_faqtitle:after{content:"";background:url(/wp-content/plugins/sseo_schema/inc/img/down-arrow.svg)no-repeat;background-size:20px;font-family:FontAwesome;position:absolute;top:50%;transform:translateY(-50%);right:10px;font-size:22px;line-height:32px;width:30px;height:30px;text-align:center;border-radius:100%;transition-duration:.5s;box-shadow:0px 0px 10px 0px #9e9e9e}
.sseo_faqs .sseo_faqtitle.f_open:after{line-height:28px;color:#ffffff;border:2px solid #ffffff;transform:translateY(-50%) rotate(180deg);transition-duration:.5s}
.sseo_faqs .sseo_faqdet{background:#ffffff!important; position:relative;float:left;width:100%;margin:0;padding:20px;border:1px solid#ffffff!important;border-top:none;display:none;}
.sseo_faqs .sseo_faqdet *:last-child, .sseo_faqs .sseo_faqcont:last-child{padding-bottom:0;margin-bottom:0}
.sseo_faqs .sseo_faqtitle{background:#f9f9f9}
.sseo_faqs .sseo_faqtitle{margin:0 !important}
.sseo_faqs .sseo_faqtitle:after{color:#b1b1b1;background:#ffffff}
.sseo_faqs .sseo_faqtitle.f_open:after{color:#ffffff;background:var(--main-color)}
window.onload = function(){if(jQuery(".sseo_faqs").length > 0){
jQuery(".sseo_faqs .sseo_faqcont:first-child").find(".sseo_faqtitle").addClass("f_open");
jQuery(".sseo_faqs .sseo_faqcont:first-child").find(".sseo_faqdet").slideDown();
jQuery(".sseo_faqcont .sseo_faqtitle").click(function(){
jQuery(".sseo_faqcont").find(".sseo_faqtitle").removeClass("f_open");
jQuery(".sseo_faqcont").find(".sseo_faqdet").slideUp();
var sseo_faqdet = jQuery(this).parents(".sseo_faqcont").find(".sseo_faqdet");
if(!sseo_faqdet.is(":visible")){
sseo_faqdet.slideDown();
jQuery(this).addClass("f_open");
}else{
sseo_faqdet.slideUp();
jQuery(this).removeClass("f_open");
}
});
}};